
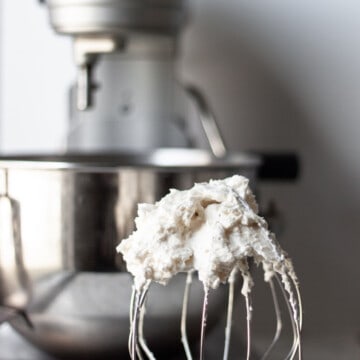
We're onto the second post of our buttercream series! Today we are talking about Italian Meringue Buttercream. This is my favorite type of buttercream. It is definitely a step up in terms of difficulty, but it is worth it. The flavor and texture of this Italian Meringue Buttercream are unbeatable, in my opinion. It is light and rich without being too sweet. I use this Italian Meringue Buttercream Recipe for cakes, cupcakes, macaron fillings, and much more.

If you missed my first post about American Buttercream make sure you check it out! I am letting you in on all of my buttercream recipes with step-by-step instructions, storage recommendations, troubleshooting, and my best tips and tricks. Buttercream is so versatile and relevant in the dessert world, so we are diving deep into how to make the perfect buttercream, no matter which variety. These are recipes that you will want to have in your back pocket!
Disclosure: This post may contain affiliate links, meaning, at no extra cost to you, I may earn a commission if you click a link and buy something.
For in-depth “whys” and “howtos”, skip to the end of this post!
If you try this recipe leave a review below or tag me on your social media!
Recipe
Italian Meringue Buttercream
Ingredients
- 1 ½ cup (300 grams) granulated sugar
- ⅔ cup (150 grams) water
- 4 large (150 grams) egg whites
- ⅜ cup (75 grams) granulated sugar
- 4 sticks (450 grams) butter softened and cubed
- 1 teaspoon vanilla
Instructions
- In a small saucepan, combine the 1 ½ cup of granulated sugar with the water.
- Place over high heat and cook to soft-ball stage (235-240 degrees F) Read more in-depth about this below. Do not stir.
- While the sugar cooks, fit a stand mixer with the whisk attachment. Pour egg whites in the bowl and whip on medium until the eggs get frothy. Slowly add the ⅜ cup of sugar to the egg whites.
- Turn the mixer to high and whip until stiff peaks form. If the meringue is done before the sugar, turn it down to the lowest speed.
- When the sugar is ready keep the mixer on the lowest speed and very carefully and slowly pour the sugar down the side of the bowl into the meringue.
- When all of the sugar is added turn the mixer to high and mix until the outside of the bowl has cooled down and is warm.
- Start to add the cubes of butter slowly, about 1 every ten seconds, while continuing to whip the buttercream.
- Add the vanilla and continue to whip on high for about 10 minutes or until it is the desired consistency.
- You can add food coloring or other flavorings at this point.
Nutrition
Italian Meringue Buttercream
- In a small saucepan combine the 1 ½ cups of the sugar and the water. Place over high heat and do not stir. You need to get the sugar to soft-ball stage. There are 2 ways that you can determine soft-ball stage.
- You can use a thermometer and heat the sugar until it is 235-240 degrees (F), but your hand will start to get hot holding it over the boiling sugar.
- My preferred method is using an ice bath. You will need to get a bowl of ice water and a metal spoon. When the sugar is all dissolved and it starts you boil you will take a very small scoop out of the center of the mixture and then dunk it in the ice water. If the sugar is at soft-ball stage you will be able to take it off of the spoon and form a soft ball of sugar. If the water is very cold, as it should be, then this will not burn your hands. You may have to repeat this process a couple of times until the sugar gets to soft-ball stage.
- Using a stand mixer (I have this one) fitted with a whisk attachment, beat the egg whites on medium speed until they start to get frothy. Slowly add the ⅜ cup of sugar to the egg whites.
- Turn the mixture to high speed and whip until stiff peaks form. If the meringue is done before the sugar mixture, then turn the mixture down to the lowest speed until it is ready.
- When the sugar mixture is ready keep the mixer on the lowest speed and VERY CAREFULLY AND SLOWLY pour the sugar mixture down the side of the bowl into the meringue. If you pour the sugar too fast or onto the whisk in the center of the bowl it might fling the boiling sugar back at you.
- When all of the sugar mixture has been added (it's okay if some is stuck to the side of the bowl) turn your mixer up to high. The bowl of the mixer will be hot. Beat the meringue until the bowl feels warm.
- Start to add the cubes of softened butter slowly, about 1 every 10 seconds, while continuing to whip the buttercream.
- Add the vanilla and continue to beat the buttercream for about 10 minutes or until it reaches the desired consistency.
- At this point, you can food coloring or other flavorings. Just be careful not to add too much liquid.
Storage
- You can store Italian Meringue Buttercream in an airtight container in the fridge for about a week or in the fridge for up to 2 months. It holds really well and will not change the texture or taste at all.
- If you store it in the fridge, set it out at room temperature for about an hour. Then place it back into your stand mixer fitted with a paddle attachment and beat on medium speed until it comes back to the original consistency.
- If you store it in the freezer, let it sit out at room temperature for a few hours. Then place it back into your stand mixer fitted with a paddle attachment and beat on medium speed until it comes back to the original consistency.
Troubleshooting
- If your buttercream is runny:
- This means that too much liquid was added at some point in the process. I find that this happens to me a lot more often when I don't weigh out my ingredients (when I use cups instead of grams). Weighing out your ingredients leaves a much smaller margin for error. The best way to fix this is to try to drain as much of the liquid off as you can and then add powdered sugar until it thickens up. This is going to change the flavor, but it will salvage the buttercream.
- It could also mean that the meringue was too hot when you added the butter, so it melted. If this is the case, refrigerate your buttercream for 10-15 minutes and then continue whipping it until it reaches the desired consistency.
- If your buttercream has chunks of butter:
- This means that your butter was too cold when you added it to the meringue. Let the buttercream sit for 15-20 minutes to allow the butter to soften and then continue whipping.
- If your buttercream is broken or looks grainy:
- This means that the butter wasn't soft enough when you added it to the meringue and it caused the meringue to seize up. This can also happen if you take the buttercream out of the fridge or freezer and don't let it soften enough before mixing. I know the buttercream looks unsalvageable, but I promise this is an easy fix. You can continue to beat the buttercream until it comes together, but this can take a while. I prefer to heat up the side of the bowl over the stove burner, just for about 10 seconds, to warm the buttercream up. Then continue whipping until it reaches the desired consistency. You may have to do this a couple of times, just be sure not to melt too much of the buttercream.
Like this post? Visit my Recipe page to see more like it!

Leave a Reply